Excel Bootcamp Summer Camp for High School and College Students Coming in June

I’m excited to announce that I’ll be teaching a new Excel course intended to help high school and college students pass their Microsoft Excel certification.

This course will connect students (ages 16+) with other peers interested in developing their Excel skills. Students will be exposed to real-world data scenarios that will challenge them to understand how data is collected, manipulated, and reported. After completing this course, students will be one step closer to passing the Microsoft Office Specialist Excel Associate Exam MO-200. 

There will be 4 sessions (select the week that works best for you) with each session lasting 90 minutes Monday through Friday.

June 1-5

June 8-12

June 15-19

June 22-26

Classes will be hosted online via Zoom from 3PM-4:30 Central.

Course objectives:

  • Manage Worksheets and Workbooks
    • Import data
    • Navigate within workbooks
    • Format worksheets and workbooks
    • Customize options and views
    • Configure content for collaboration
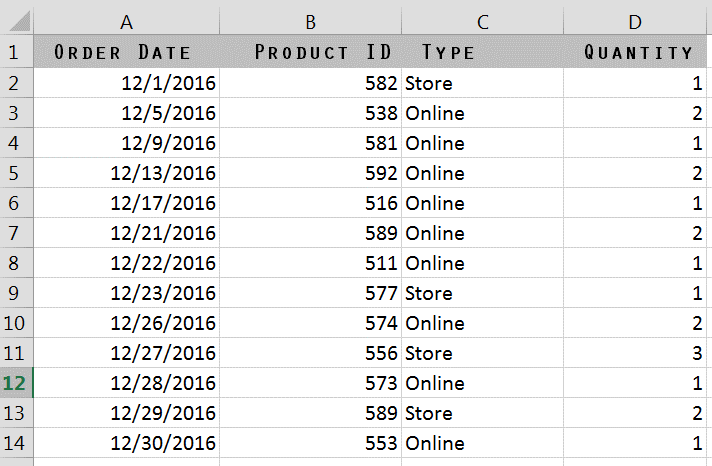
  • Manage Data Cells and Ranges
    • Manipulate data in worksheets
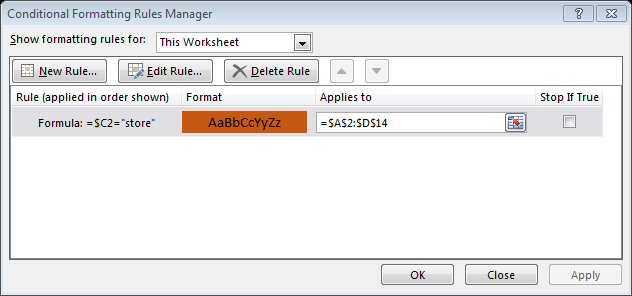
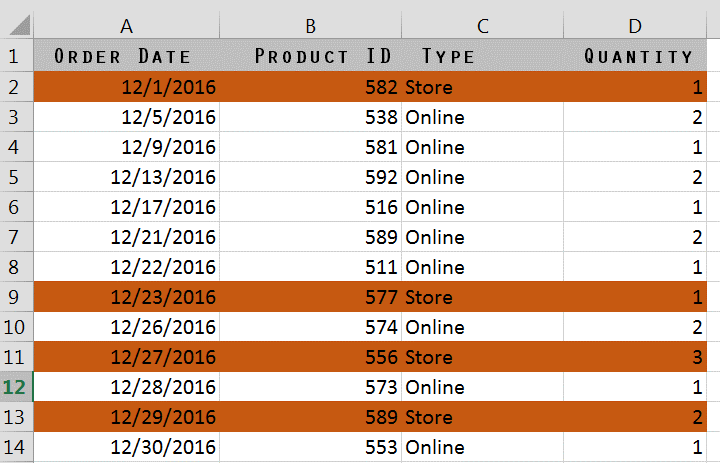
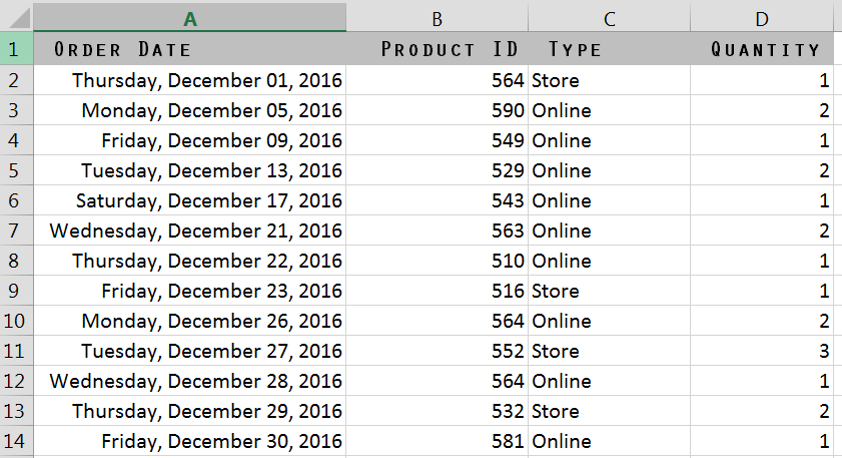
    • Format cells and ranges
    • Define and reference named ranges
    • Summarize data visually
  • Manage Tables and Table Data
    • Create and format tables
    • Modify Tables
    • Filter and Sort table data
  • Perform Operations by using Formulas and Functions
    • Insert references
    • Calculate and transform data
    • Format and modify text
  • Manage Charts
    • Create Charts
    • Modify Charts
    • Format Charts

Dylan Lynch and Steve Chase will co-teach this Excel bootcamp class. Dylan is a computer science major at Alamo College in San Antonio and is certified in Microsoft Office. Steve is the founder of Sequentia Solutions, a bookkeeping and training firm. Together they have co-taught many QuickBooks Online and Excel courses in the greater San Antonio, TX area. 

Class price is only $150 for a weekly session and $120 for early bird discount. Registration details found here at www.sequentiasolutions.com/bootcamp or by calling Steve Chase at 210-410-4332.

After completing the class, students will be encouraged to take the Microsoft Excel Associate Certification MO-200. Students will receive a class recording to help them review the material and use for future study materials.

-Steve “always be learning” Chase

Posted in Uncategorized | Tagged | Leave a comment

Excel’s hottest new feature, the Xlookup formula

Have you heard the big news that Excel has a new successor to the Vlookup? It’s the Xlookup function which was recently announced. Office 365 Insiders have access to it right now, but it will eventually be rolled out to all users in waves.

The top 3 functions used by Excel users are

  1. SUM
  2. AVERAGE
  3. VLOOKUP – (been around for 34 years)

Here’s my video tutorial of using the Xlookup.

Posted in Excel, Uncategorized | Tagged | Leave a comment

My 6 Recent Blog Posts I published on my other website

Hi Friend,

Thank you for your support and following of my Steve Chase Docs blog. I am really blown away by my readers – (that’s you!). Your attention and eagerness to read my posts have amazed me. Since I started my own company I have primarily changed my blogging platform to my new website at Sequentia Solutions. Here are some of my articles and videos I have published on that platform that you may have missed if you only check this blog.

And a huge thank you for those of you that have supported purchasing my Kindle book, “Finding my trail and faith at Philmont” which I published on 4/5/2018. It is my personal story I wrote to my 4 sons on my journey to earning Eagle Scout, mistakes I made in college, and freedom I found at Philmont Scout Ranch in the Sangre de Cristo mountains in New Mexico.

The best place to catch my future blog posts would be at www.sequentiasolutions.com/blog

Have a great day!


Steve Chase


Posted in Excel, My Philmont Biography Book | Leave a comment

I’m excited to share my published book is now available on Kindle

Today I published my first book on Kindle! This is not my typical Excel or QuickBooks blog post. Rather it is something that I am deeply passionate about that goes way deeper than my vocation. My book is called Finding My Trail and Faith at Philmont. It is my journey as a Boy Scout working to earn my Eagle rank. It shares my mistakes I made in college. And the best part of the book is when I found my freedom my first summer after graduating from college at Philmont Scout ranch. If you have had me before in class, you know that I love New Mexico. I share my fondest memories and journal entries of my 3 summers I spent in Cimarron, New Mexico at one of the most beautiful mountainous spots that is called Philmont Scout ranch.

I wrote this book for my 4 sons. If you have a son in Boy Scouts or is getting ready to take on a high adventure trek at Philmont, I would be honored if you purchased a copy. The price is $4.25.

Posted in My Philmont Biography Book | 4 Comments

Join me for 3 free Excel webinars

I’d like to invite you to join me in an upcoming Excel 3 part webinar series. These sessions are for anyone wanting to get better at Excel.

Excel webinars

Session #1 Excel Tables on 2/22

(Sort, Filter, Calculations within Tables)

Session #2 Excel Conditional Formatting on 3/8

(icon sets, data bars, duplicates, top/bottom values, color scales)

Session #3 Excel Formulas on 3/29

(IF, SUMIFS, VLOOKUP)

All sessions are from 1:05pm EST to 1:35pm CST.

Here is the registration link to sign up for any of the free sessions.

Posted in Excel, Uncategorized | 3 Comments

I am excited to announce my new business: Sequentia Solutions

I am excited to announce that I am starting Sequentia Solutions company to help small business owners. My business will help entrepreneurs grow their business and help them achieve their goals with efficient systems and processes.  It is bittersweet to be leaving New Horizons which I am very proud of the many wonderful relationships I formed with my students and fellow staff. I am grateful for all that New Horizons gave me to learn and develop both personally and professionally, including providing me with a training path for me to achieve 18 certifications in Microsoft Office. I feel wind in my sails from the New Horizons community to help me take off into deeper waters in life. My dad had owned several New Horizons in the Ohio Valley before he passed away in 2006. He taught me many leadership lessons in business and family life in which I can help pass along to my clients.

1SequenSolLogoColor

Question: What is sequentia?

Answer: It is Latin for sequence.

Question: What will your new services be?

Answer: I will provide QuickBooks Online bookkeeping services and help set up and manage systems and business marketing automation using OntraPort software. Sequentia Solutions will give me a new chance to do some very new and exciting things along the way!

After leaving New Horizons I have been busy pursuing two new fields of certification.

I took a QuickBooks Online certification course and I happy to have learned many new skill sets which has made me a certified QuickBooks ProAdvisor.

QuickBooks ProAdvisor

I also traveled to Santa Barbara to take a week long certification course to become an OntraPort Certified Consultant. OntraPort provides business owners with an all in one software solution to manage CRM and business marketing and automation.

OntraPort Certified Consultant

Question: How do you plan on doing all of this?

Answer: I plan on always learning and growing to help out my clients in the best way possible.

Question: What is one thing you are glad you did after starting on your own?

Answer: I am really glad that I purchased the Clifton Strengths Finder 2.0 book and assessment test. I discovered that my top 5 strengths are: Learner, Discipline, Harmony, Responsibility, and Belief. I will lean on my strengths in my new journey.

Question: Where can I find more information on your services?

Answer: Head over to my website, www.sequentiasolutions.com and like my new Facebook page

P.S. I still plan on blogging but will be publishing my posts on my new website. Check out my new website and it’s free resources here.

Posted in Excel | 4 Comments

Capture a Screen Recording as MP4 Video Format Using PowerPoint 2013 or 2016

Have you ever needed to create a video with narrations of your computer screen? In this post I will explain how to do that using the desktop Windows versions of PowerPoint 2013 or 2016. This new feature in PowerPoint is a great tool to get the job done in no time. When completed you will have an MP4 video format that can be shared via email or published online to your audience.

screen recording
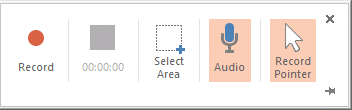
Before you begin open up the desktop version of PowerPoint 2013 or 2016 and check the Insert tab and verify you have the updated Media group with Video, Audio, and Screen Recording. Also do a test audio configuration of your microphone.

screen recording

Click Screen Recording and then choose Select Area.

select area

Drag the mouse pointer around the area you want to screen record. It will display a red dashed box around the area that will be recorded. Tip: Make the box as large as the monitor if you want to capture your whole screen or make the box smaller within the focus program to only select a portion of your screen. Once the recording starts any program that overlays inside the red box will get recorded. Anything outside the red box will not be recorded.

red box

Make sure you close any instant messaging program or email notification alerts that may distract your screen recording.

Click Record  when ready and you will see a 3-2-1 countdown. To  finish either use the shortcut key (Window key +Shift + Q) or click stop. The display bar may be hidden based on the pinned status so move your mouse to the top of the window to reveal the stop button.

The recording will appear on the PowerPoint slide as a video object as soon as you click stop recording. To export the video, right click and choose “Save Media as”.

save media as

The video will save as the mp4 format.

mp4

Tip: Before you save your mp4 video, you can first trim out the beginning or end of the video clip from the Video

trim video

I hope you found this post helpful. Here is a link to some of my favorite PowerPoint keyboard shortcuts.


Posted in PowerPoint | Tagged | Leave a comment

Create an Access Report with Subtotals and Percentage Formulas

In this post I will explain how to create an Access report that has subtotals and percentage formulas. The first step is to ask the question for which the report will answer. Lets look at the screenshot below and ask “Which country has the highest units sold?” and “What is the percentage of the total units sold per country?” We will group the report by country which has United States, Canada, Brazil and the Dominican Republic.

sales table

First click the Insert tab and chose report wizard.

report wizard

Select the table(s) or query you want to work with.

fields

Select the fields you want to be included in the report.

group

Group by country.

summary options

Select summary options.

calculate options

Click sum and check the box to calculate percent of total for sums.

select

name the report

Name the report and click finish.

You could touch up the report by clicking on the design view.


Posted in Access | Leave a comment

Highlight Rows of Data in Excel with Conditional Formatting Formulas

In this post I will explain how to format certain rows in Excel with formatting that matches a condition set you a formula.

First lets study the sample dataset in the screenshot below.

data

Observe that the first row of data is row 2 because we have a header row. So that means I will need to start off selecting the dataset with row 2. Then I will choose the conditional formatting button from the home tab and click new rule. When the new rule dialog box displays, I will click “Use a formula to determine which cells to format”.

Lets say that I want to highlight an orange row for all records that sales were sold in a “store”. Column C has either “store” or “online”. It will be important to write the formula using the first row of data that references the cell of that row. The formula will be =$C2=”store”. The reason for the dollar sign in front of column C is that is will absolutely reference column C. I do not want a dollar sign in front of row 2 because I want that formula to go down relative to all the other rows till the end of my dataset. Not certain you understand the difference between $A$1 and A1 then check out my video post explaining when you use absolute vs relative.

rules manager

Pick a format fill and then click ok.

rules managere

Here is what I get. All the rows containing “store” will show up in orange.:)

excel conditional formatting rows with orange

Let me do another example

Ok in this next lesson I will format all the rows that are Fridays. I can format the dates to long date format just to peek at the days of the week to help the screenshots.

fridays

First I will select the dataset and then click the conditional formatting command to add a new rule. I will use the WEEKDAY() function which results in a value 1 to 7.

Sunday=1

Monday = 2

Tuesday =3

Wednesday =4

Thursday=5

Friday=6

Saturday=7

My formula will be =WEEKDAY($A2)=6.

Friday = 6

And my result is that all rows will turn green when the date is a Friday.

friday rows green


For more cool things you can do with dates use the DATEDIF formula. Details here.

Download my Excel keyboard shortcuts or Income and Expenses budget.


Posted in Excel | Tagged | 1 Comment

Straighten and Crop an image in Photoshop

This post will teach you about a feature that is connected to the crop tool in Photoshop. Open the photo and then click the crop tool or hit the shortcut key “c”. Once you activate the crop tool you will have the “Straighten” command in the tools panel above.

Click “Straighten” and then draw a line with the mouse across the horizon you want to be the corrected. The photo will rotate and crop out the corners. Then click the check mark or hit enter to commit changes

Before

before

After

after


Posted in Photoshop | Leave a comment